客户端脚本
如果无法播放,点此直接下载/打开
介绍
客户端脚本支持对象在不同页面,比如详情页,新建页,列表页的特定时机运行一段JavaScript脚本,基于CCDK的桥接能力,实现更多的自定义功能。
进入脚本设置页面
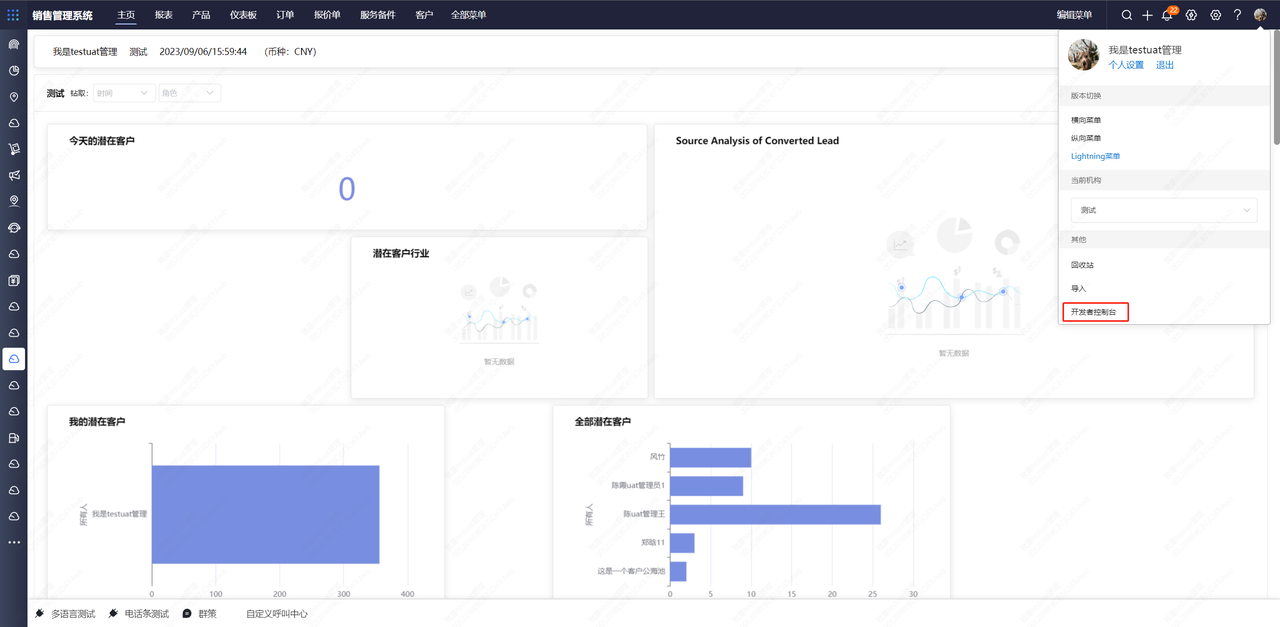
- 登录系统,点击右上角人头像,选择开发者平台按钮,此按钮目前只开放给管理员简档用户。
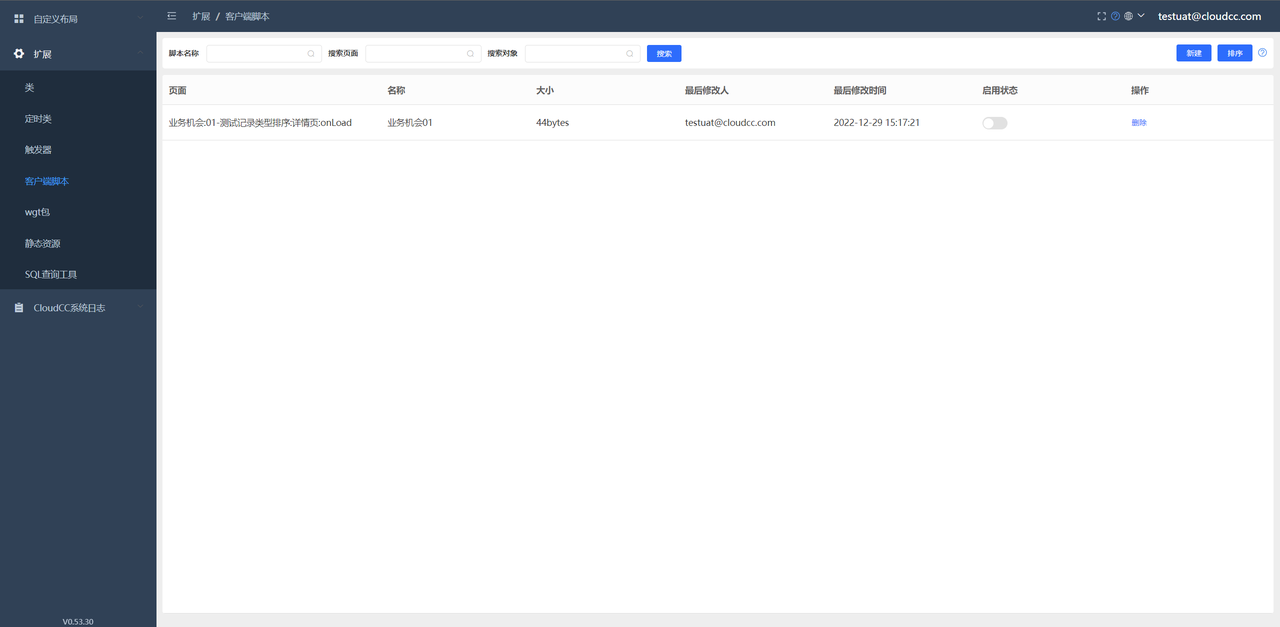
- 选择左侧:扩展——》客户端脚本
新建脚本
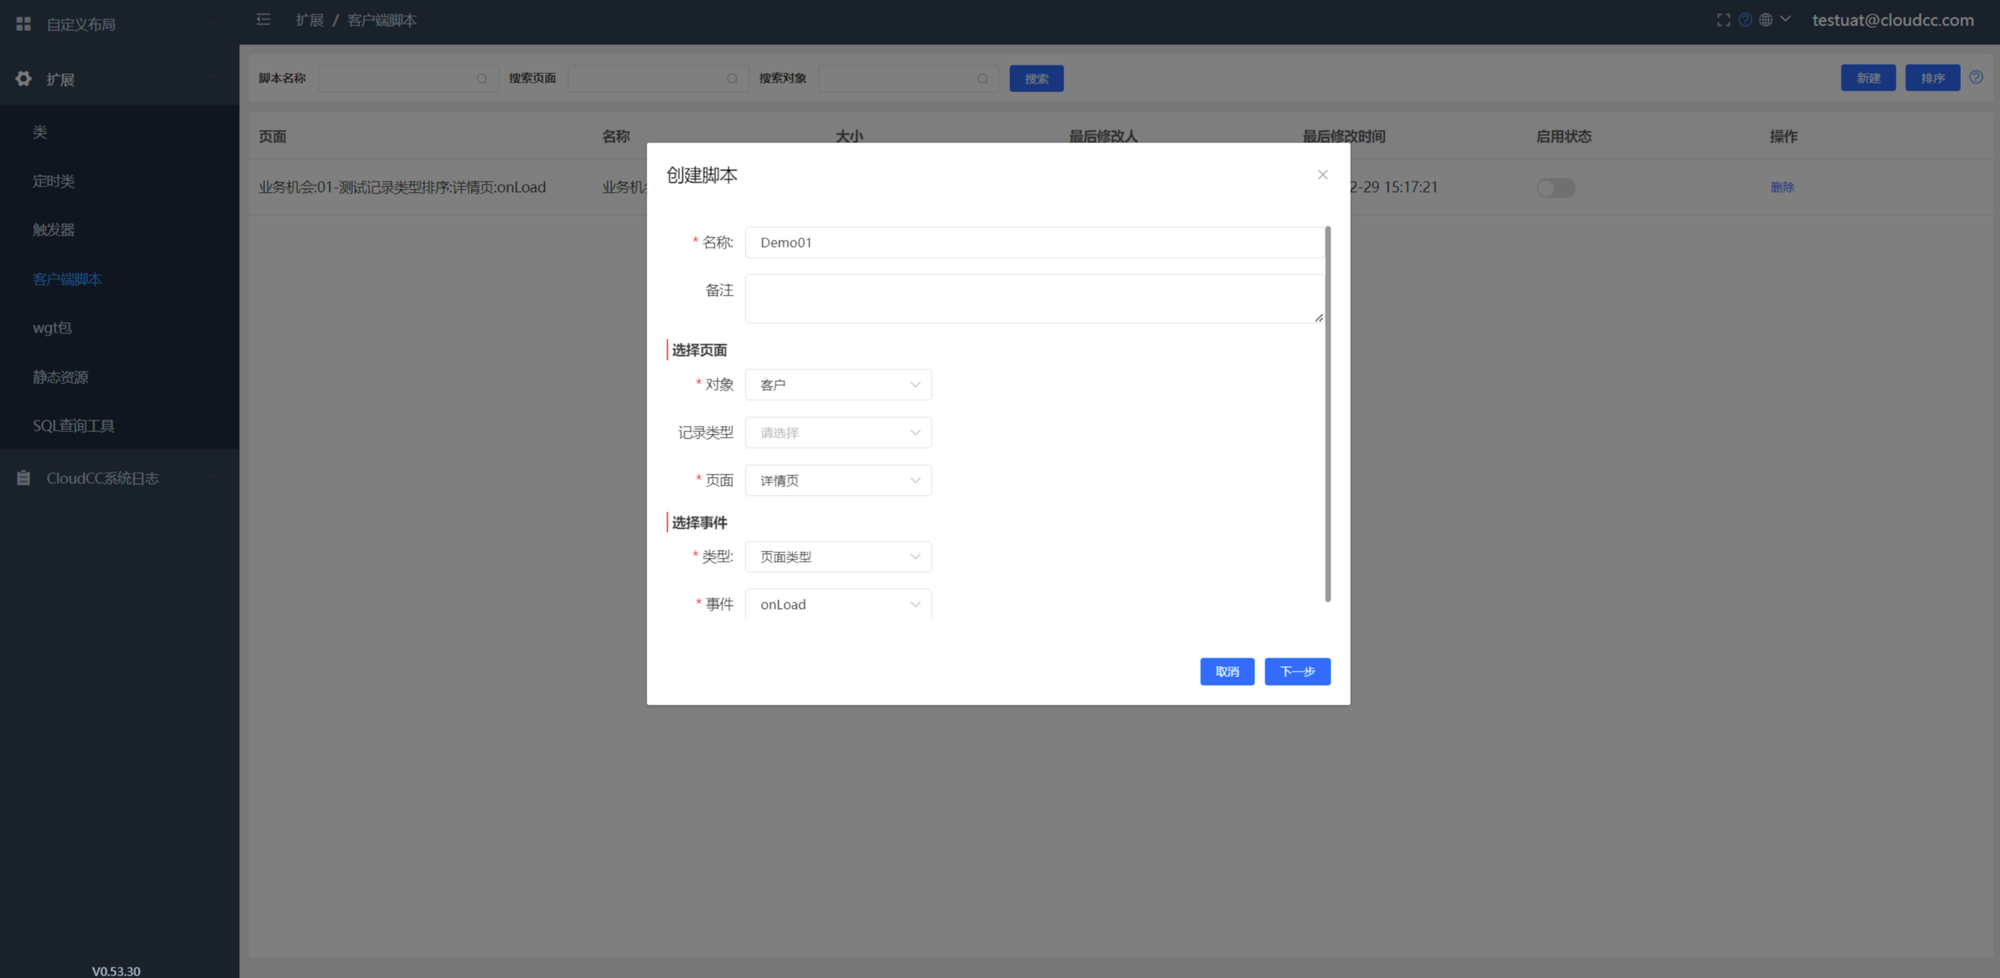
- 点击右上角新建,填入以下信息,点击下一步,页面与事件关系
- 代码输入区,输入以下代码,点击右上角保存,查看CCDK更多教程
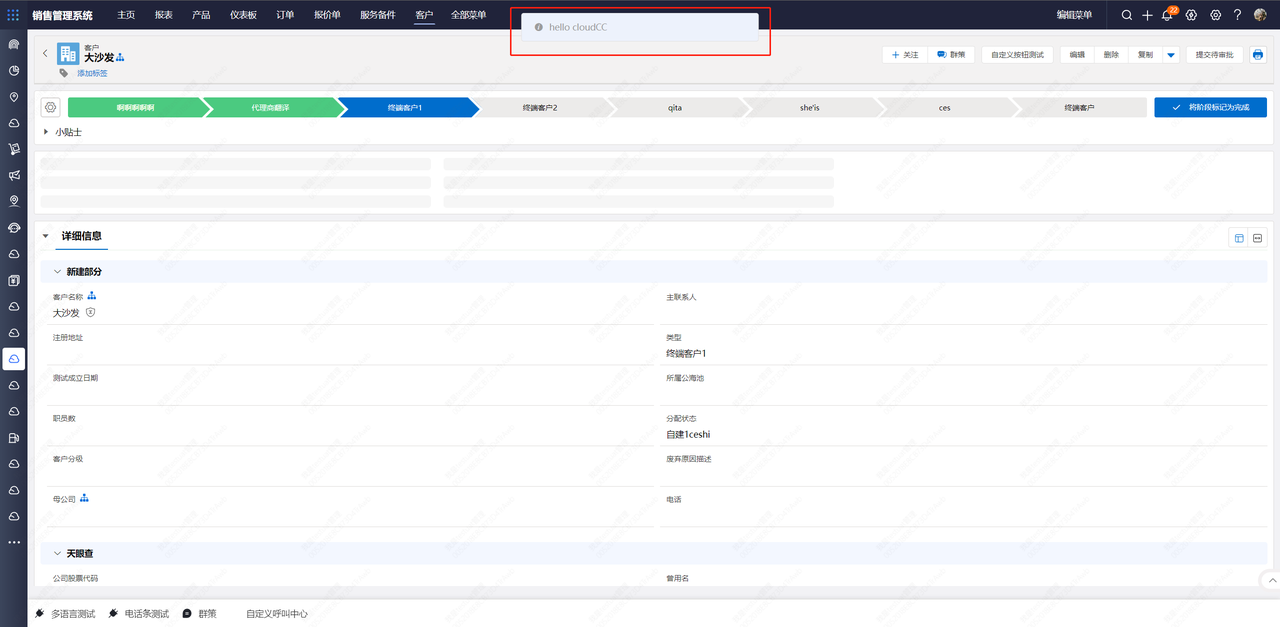
$CCDK.CCMessage.showMessage('hello cloudCC')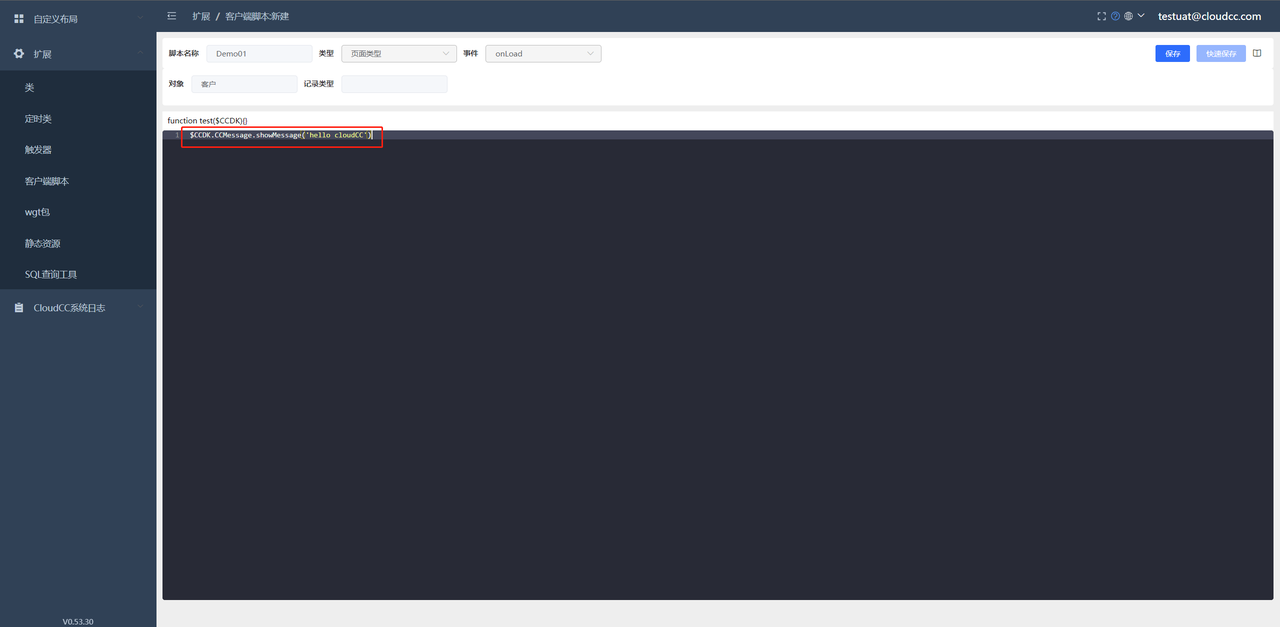
回到前台查看效果
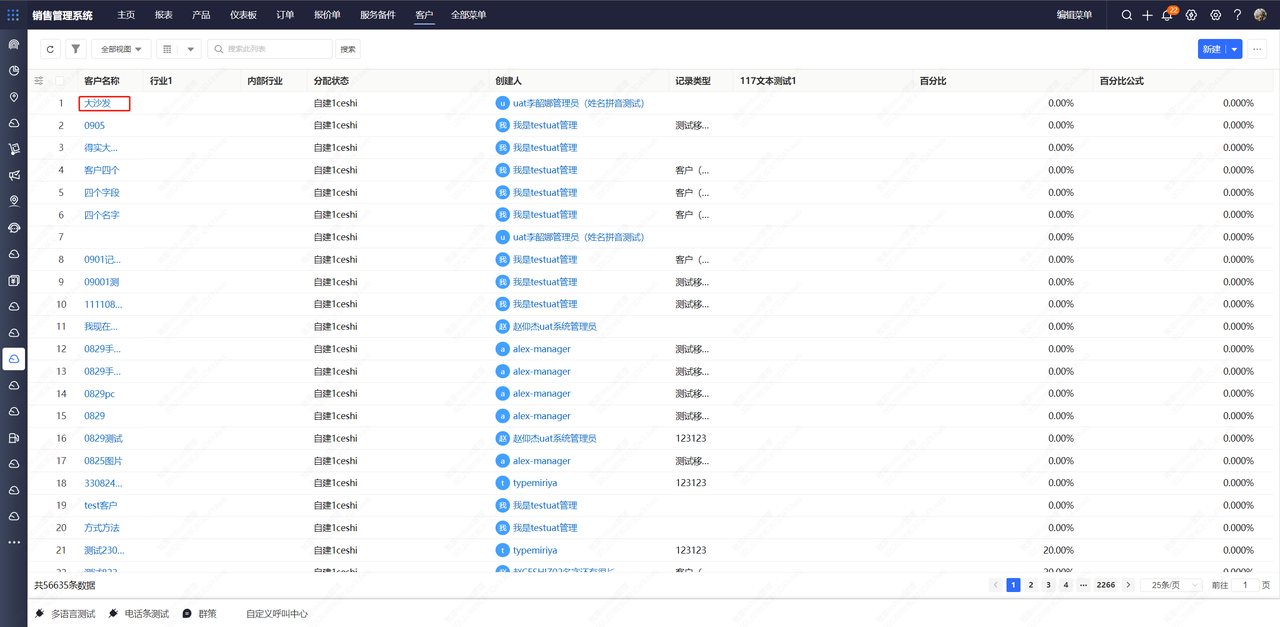
- 点击客户菜单,选择任意一条数据进入详情页
- 会看到提示信息
示例
为了方便开发者更方便控制元素,我们在平台的关键dom上添加了devid自定义属性,此ID使用特定的业务ID绑定,可以标记出系统的特定元素,
用于控制查看页面结构说明
案例说明
- 禁用编辑页的“分级”字段
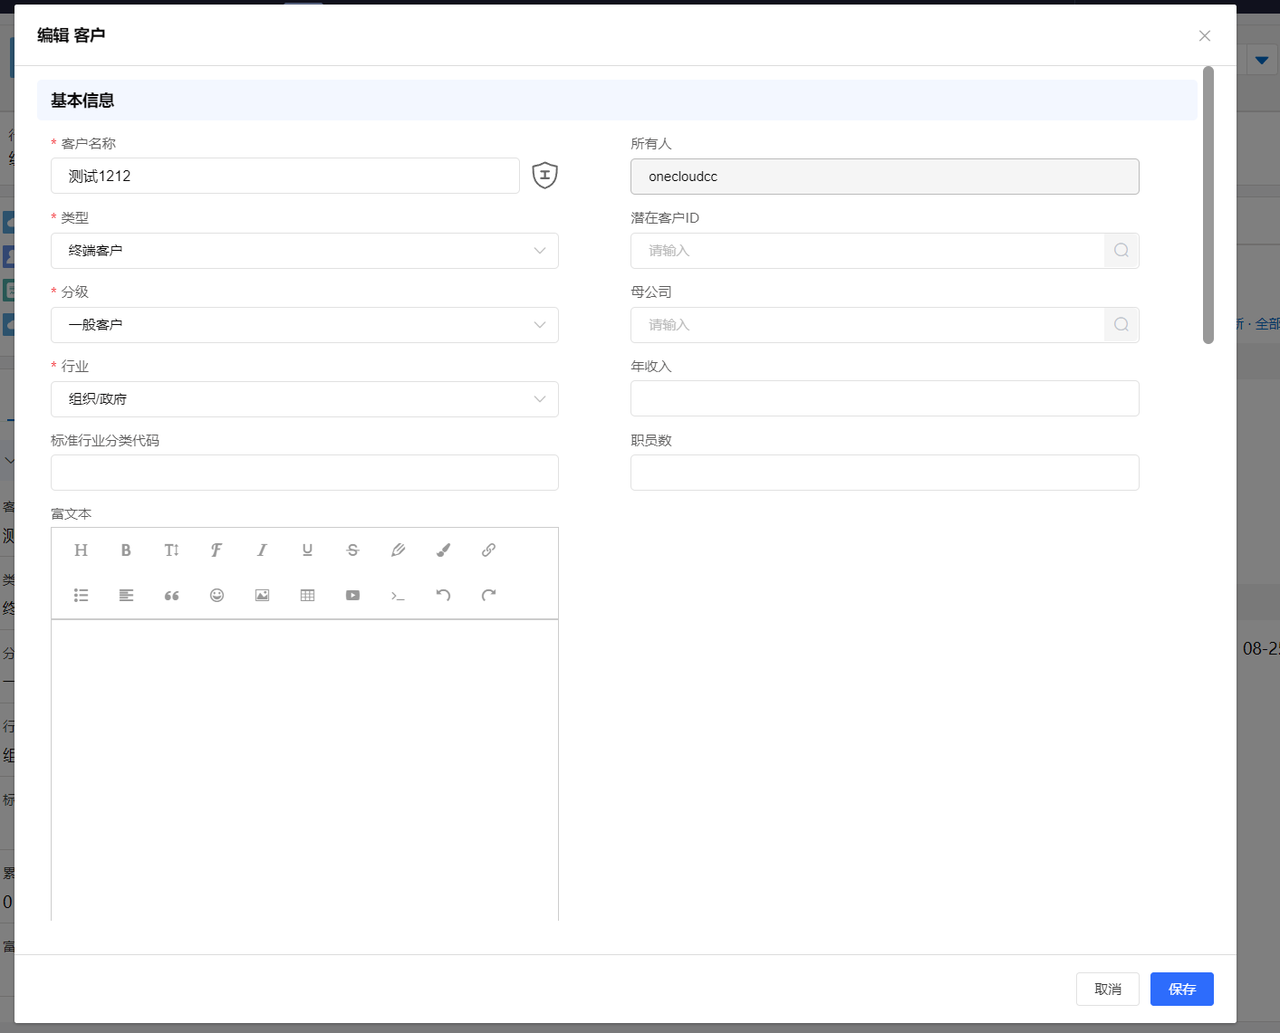
第一步:查看devid
- F12打开浏览器控制台,选择元素,如果没有可能收起在更多中了
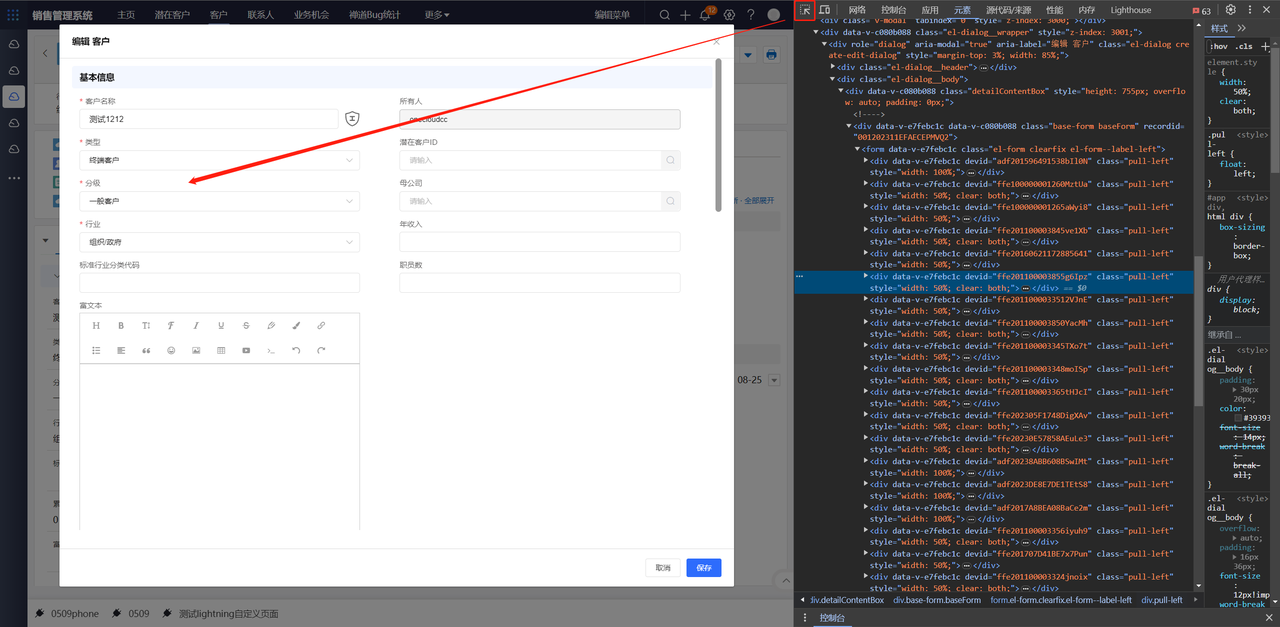
- 使用元素选择器选取元素,点击元素选择器,点击页面上的元素
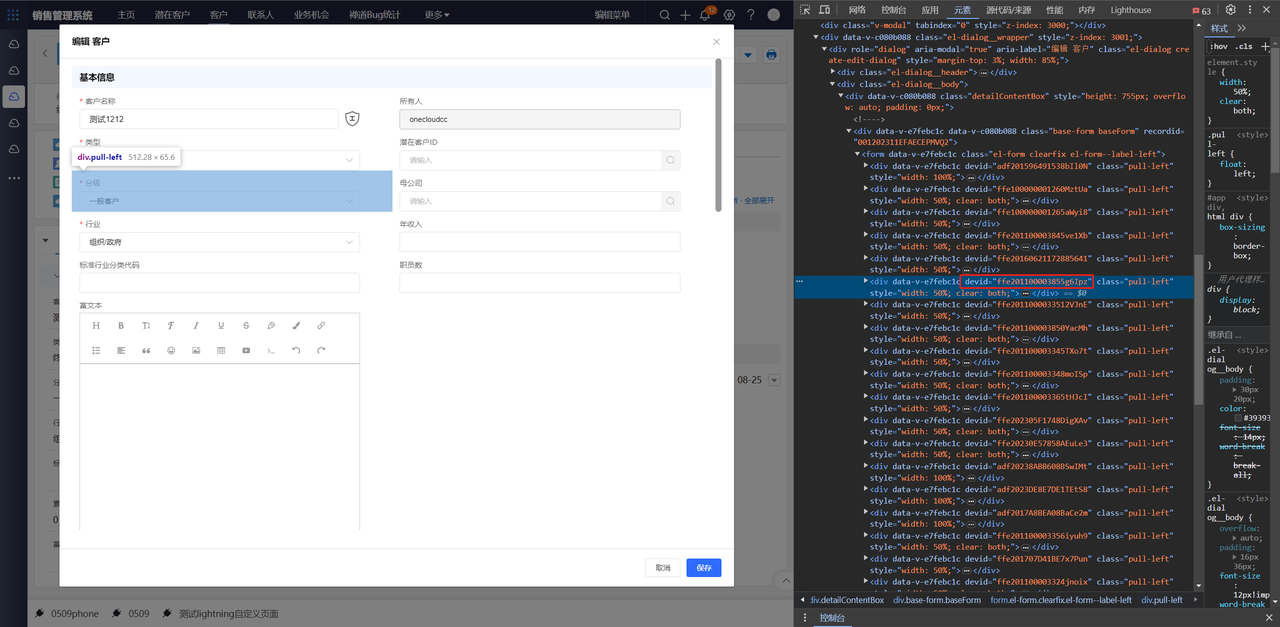
- 查看样式名称,复制出来备用
第二步:创建客户端脚本
- 选择如下配置
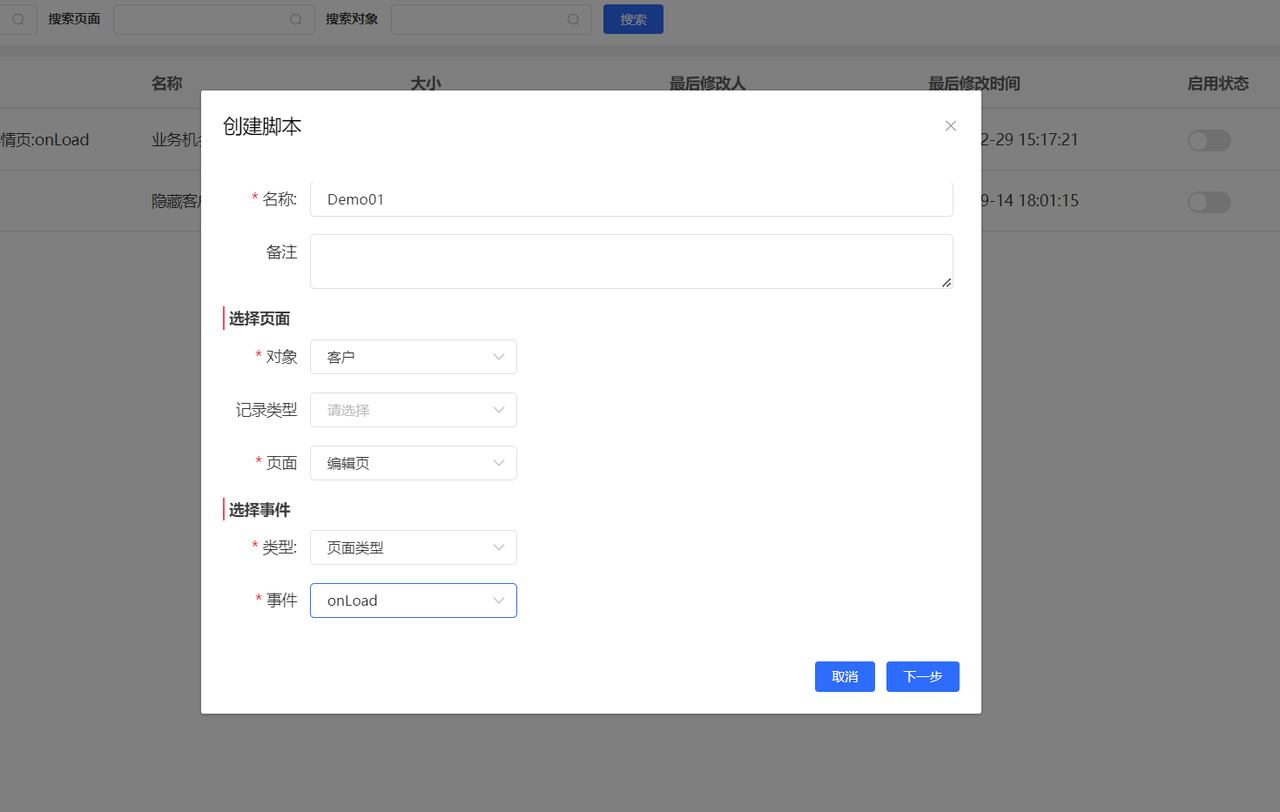
- 创建脚本内容
- 保存脚本,回到客户详情页查看结果
// 方式一
let style = document.createElement('style');
style.type = 'text/css';
style.innerHTML='[devid="ffe201100003855g6Ipz"]{pointer-events:none}';
document.getElementsByTagName('head').item(0).appendChild(style);

// 方式二
let dd = document.querySelector('div[devid="ffe201100003428r65pk"]')
if(dd){
    dd.style.display="none"
}
第三步:效果展示
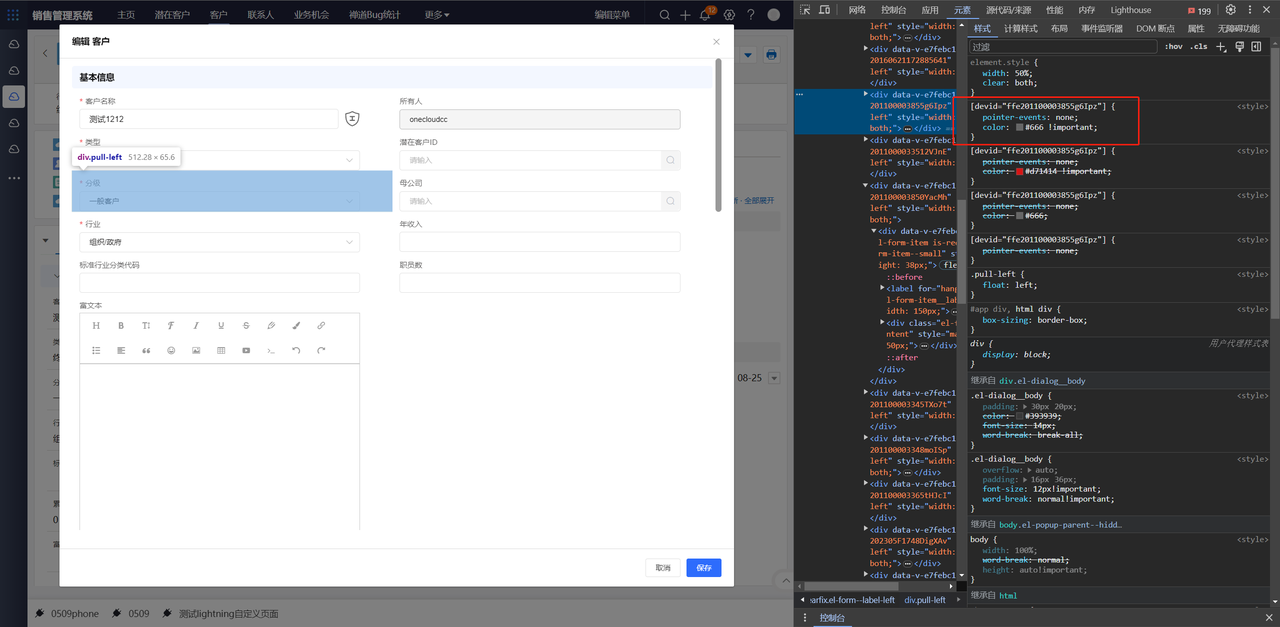
示例:隐藏详情页基本信息某个字段
为了方便开发者更方便控制元素,我们在平台的关键dom上添加了devid自定义属性,此ID使用特定的业务ID绑定,可以标记出系统的特定元素,用于控制查看页面结构说明
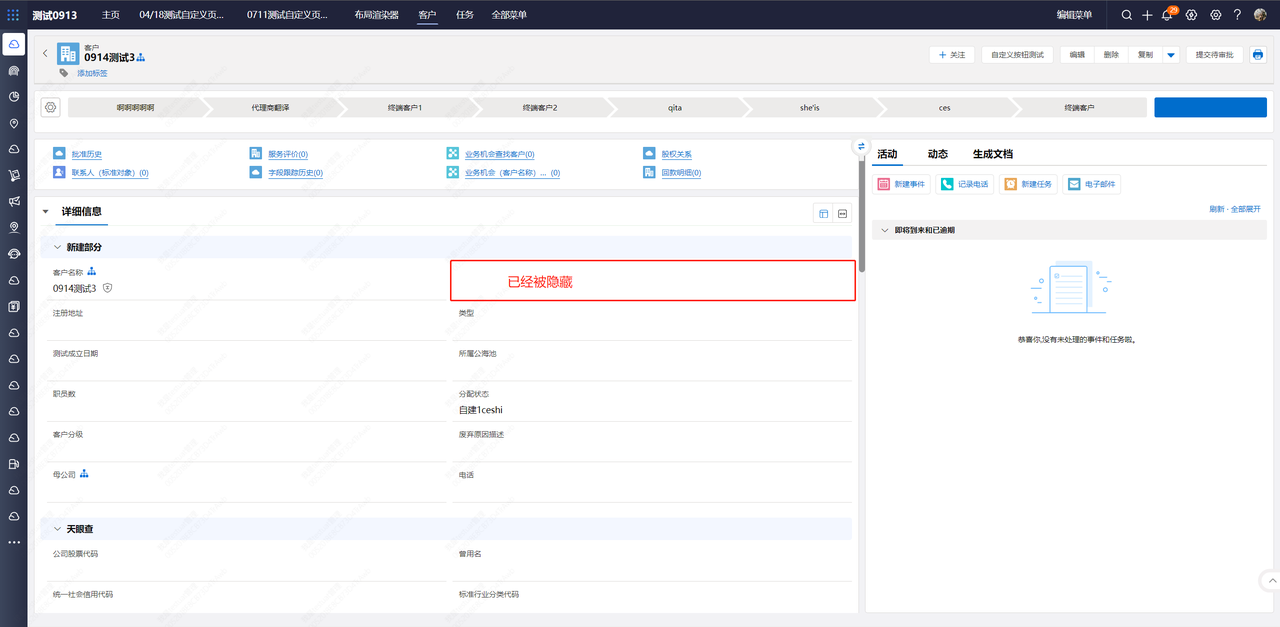
隐藏”主联系人字段“
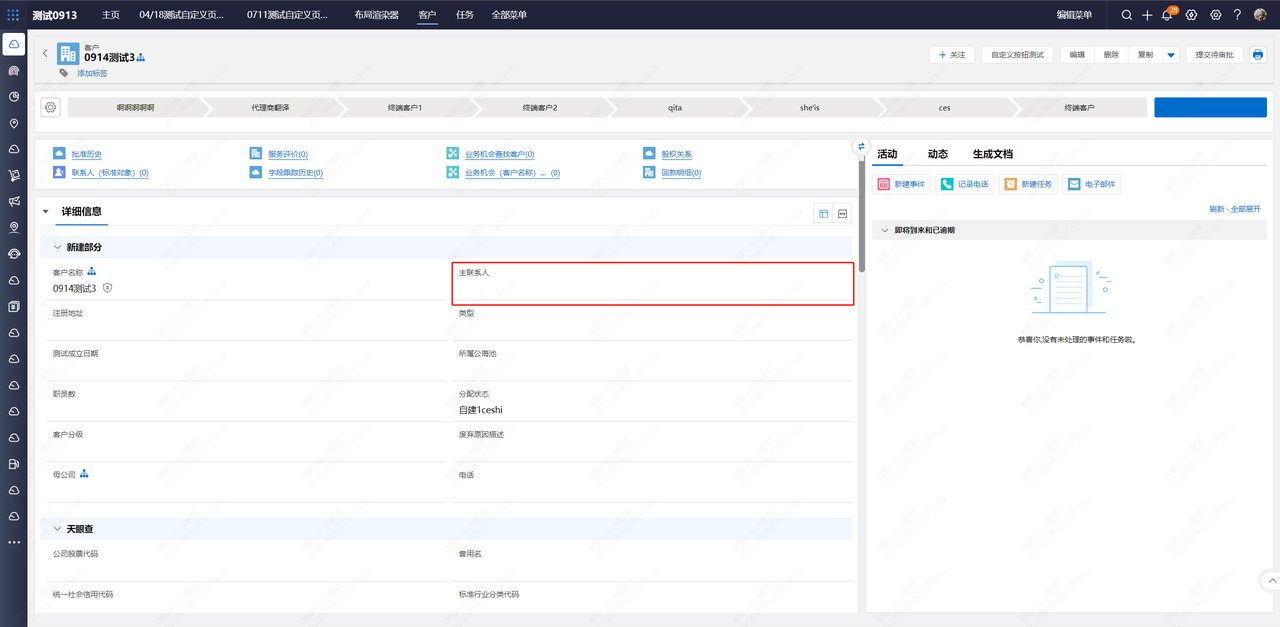
查看devid
- F12打开浏览器控制台,选择元素,如果没有可能收起在更多中了
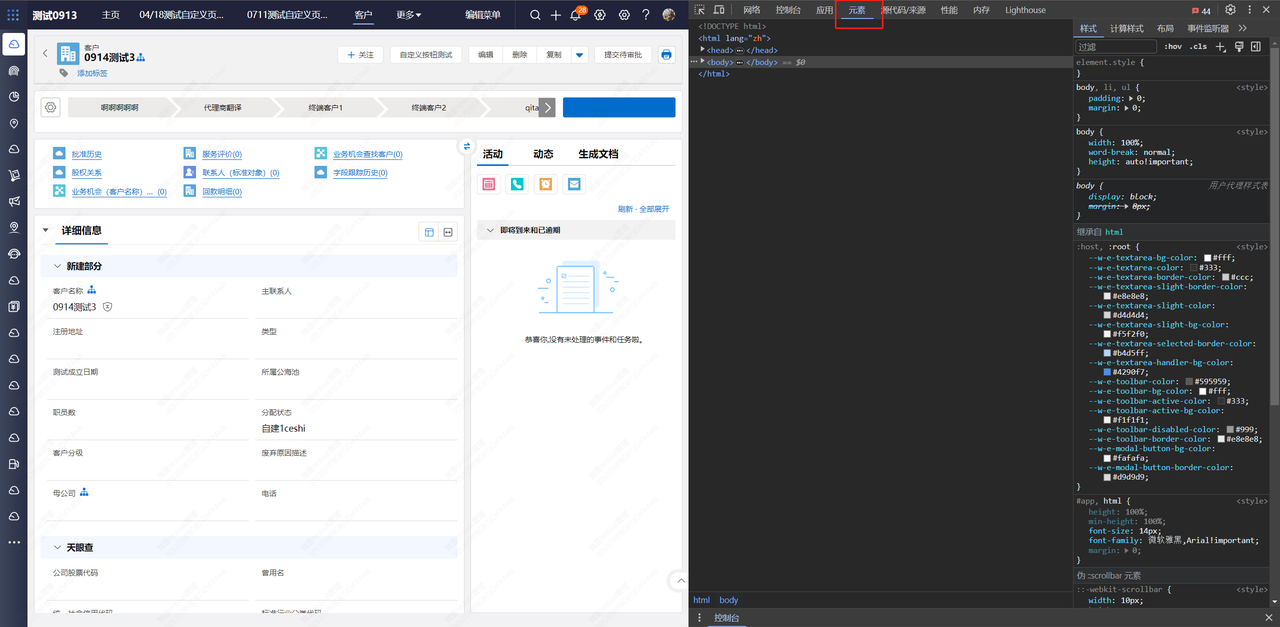
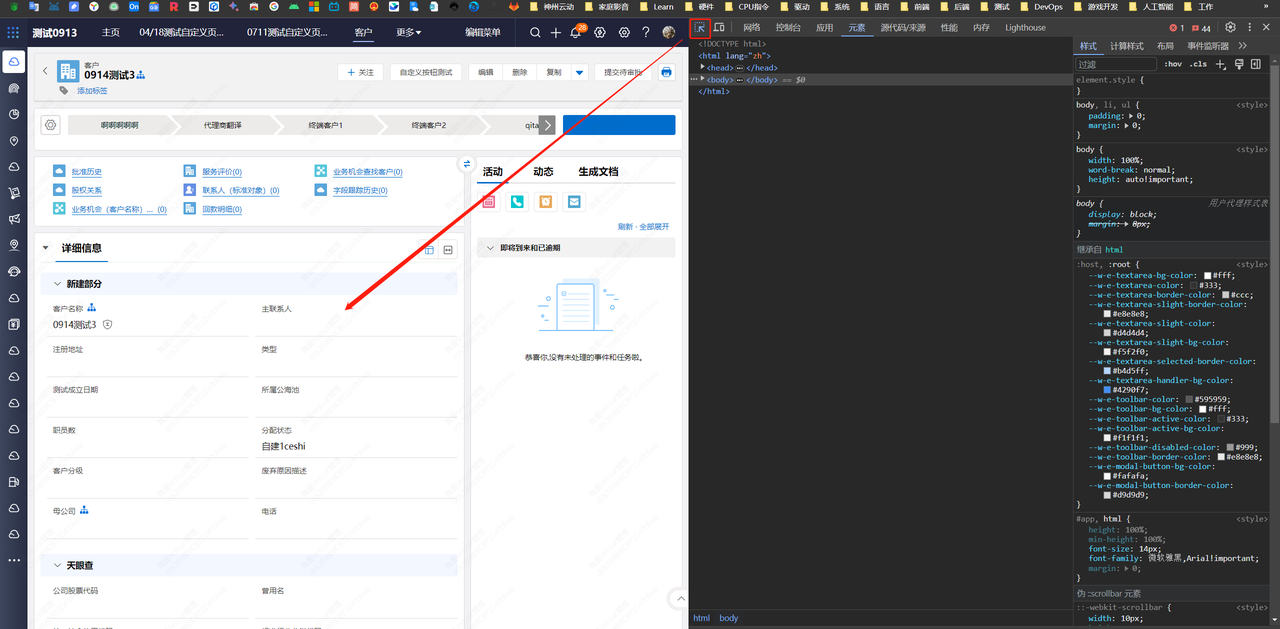
- 使用元素选择器选取元素,点击元素选择器,点击页面上的元素
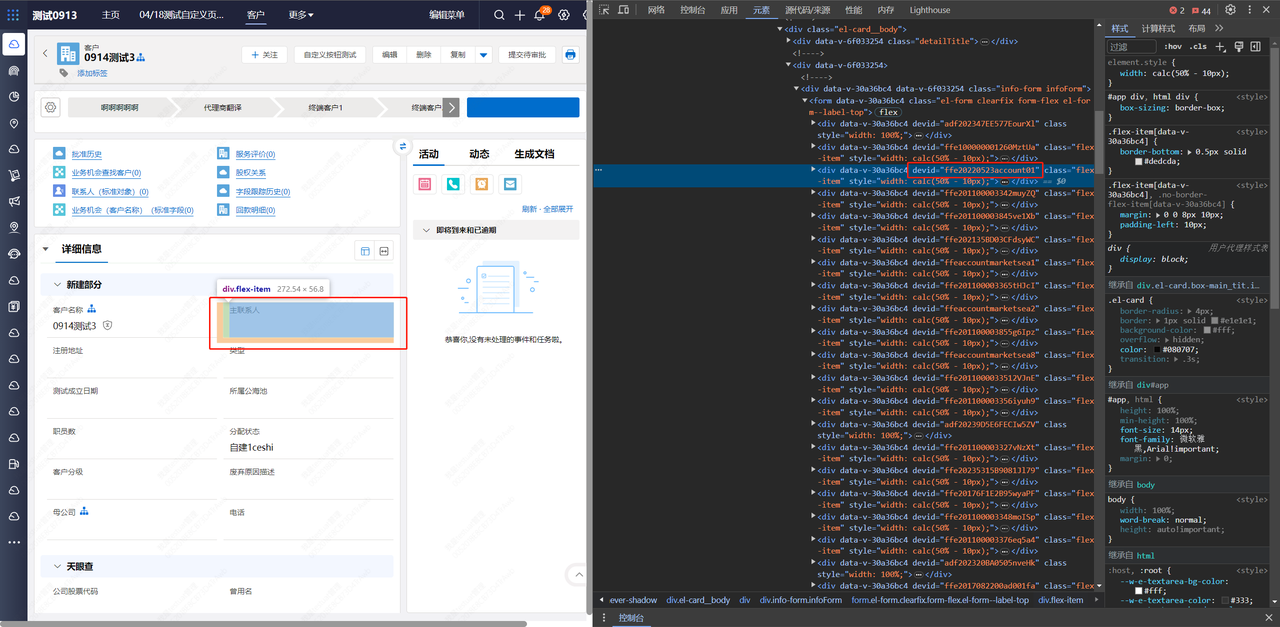
- 查看devid,复制出来备用
创建客户端脚本
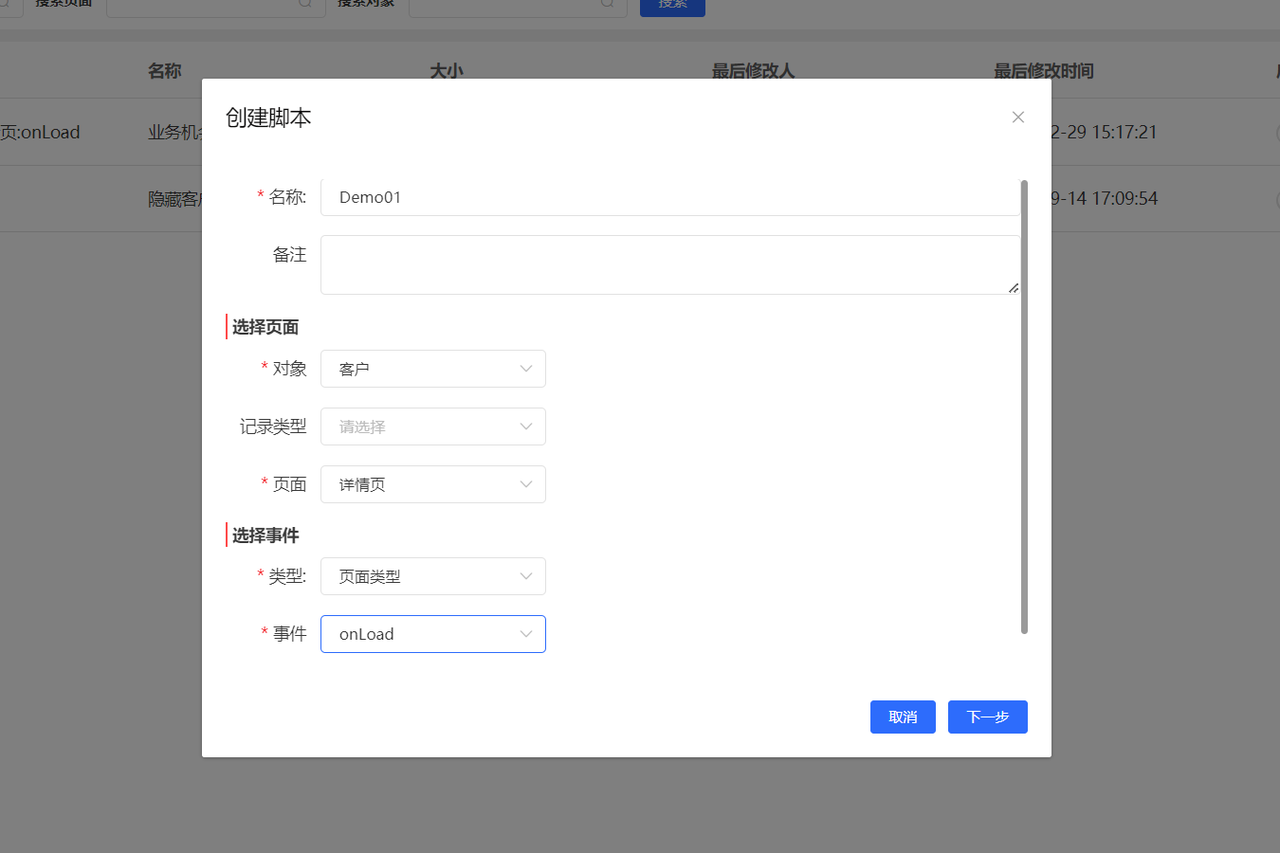
- 选择如下配置
- 创建脚本内容
- 隐藏元素,并占用空间
- 隐藏元素,并且不占用空间
- 保存脚本,回到客户详情页查看结果
let style = document.createElement('style');
style.type = 'text/css';
style.innerHTML='[devid="ffe20220523account01"]{display:none !important}';
document.getElementsByTagName('head').item(0).appendChild(style);
let style = document.createElement('style');
style.type = 'text/css';
style.innerHTML='[devid="ffe20220523account01"]{visibility:hidden !important}';
document.getElementsByTagName('head').item(0).appendChild(style); 效果
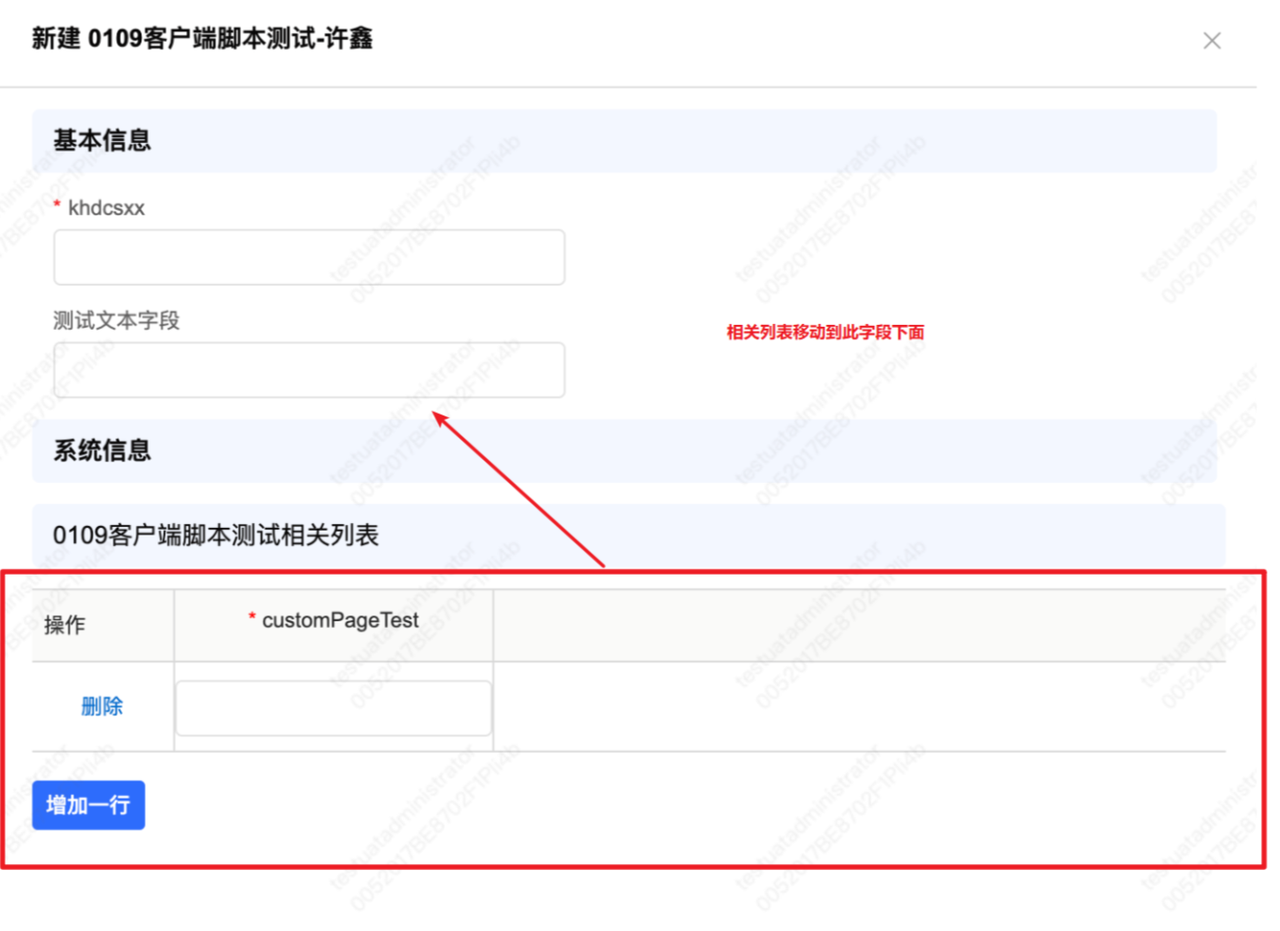
示例:移动页面元素到其他位置
为了方便开发者更方便控制元素,我们在平台的关键dom上添加了devid自定义属性,此ID使用特定的业务ID绑定,可以标记出系统的特定元素,用于控制查看页面结构说明
查看devid
- F12打开浏览器控制台,选择元素,如果没有可能收起在更多中了
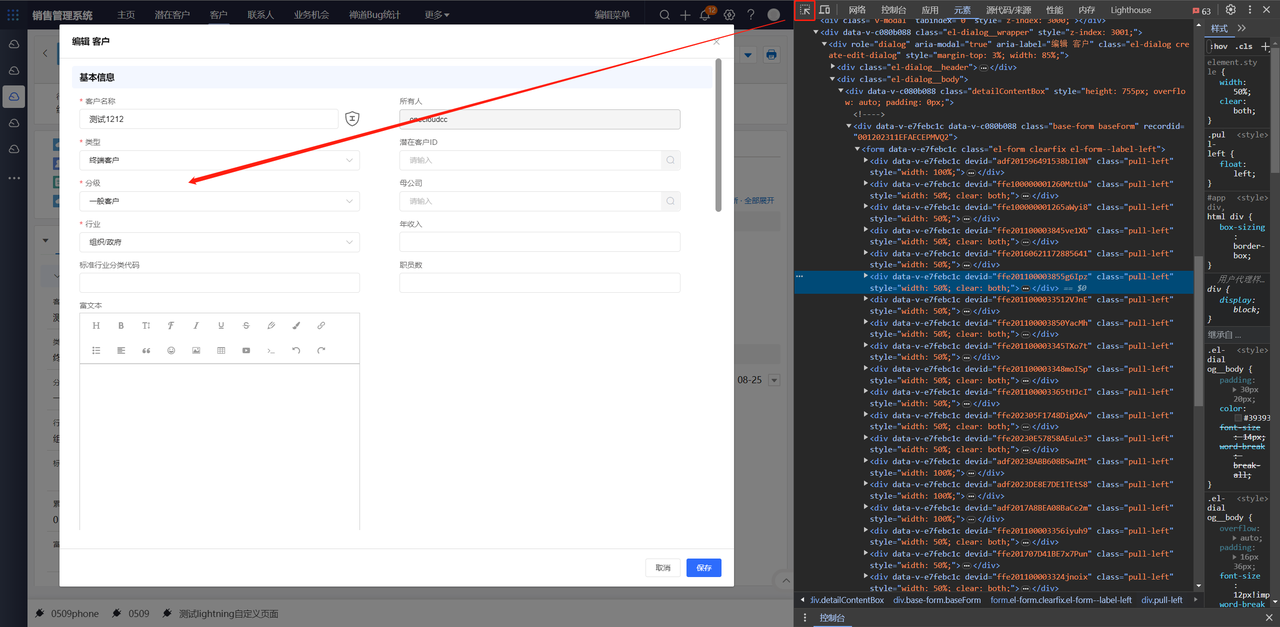
- 使用元素选择器选取元素,点击元素选择器,点击页面上的元素
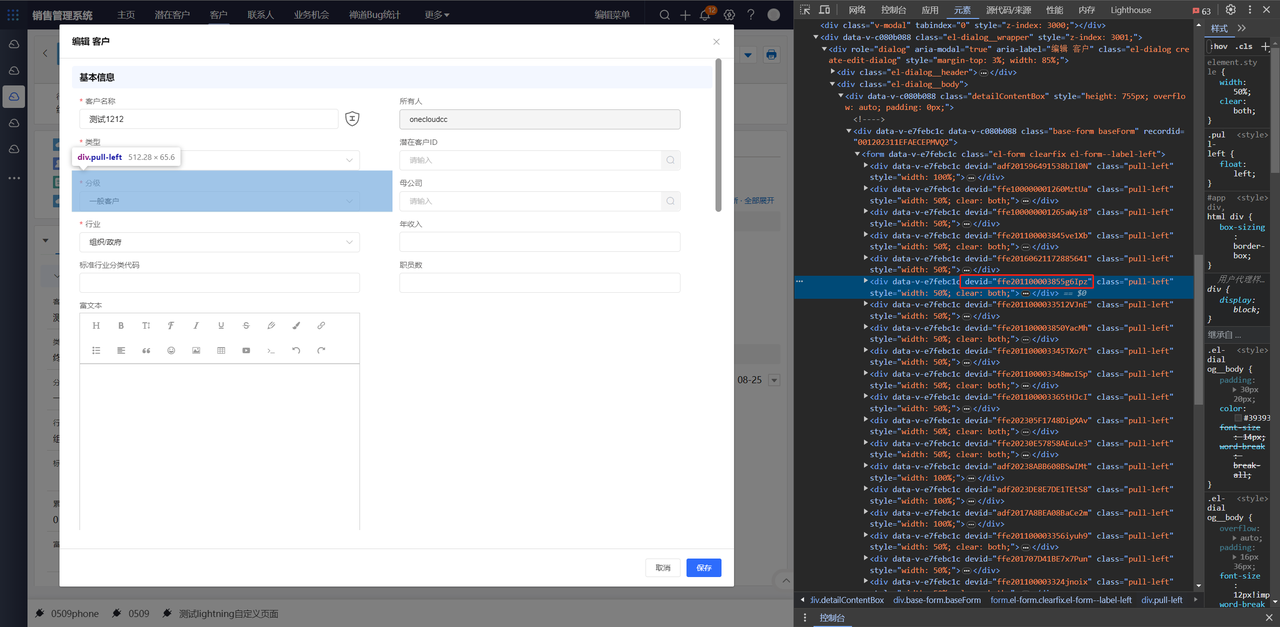
- 查看devid,复制出来备用
编写客户端脚本
// 获取要移动的节点
const moveNode = document.querySelector('[devid="aee2024EFBBA5EEfs1Ta"]');
 // 移动到目标节点
const  targetNode = document.querySelector('[devid="adf2024D33E03DA6xzBj"]');
// 目标节点的父节点
const targetParentNode = targetNode.parentNode;

//将需要移动的节点 插入到 父节点下的目标节点前面
targetParentNode.insertBefore(moveNode,targetNode)
添加脚本后的页面
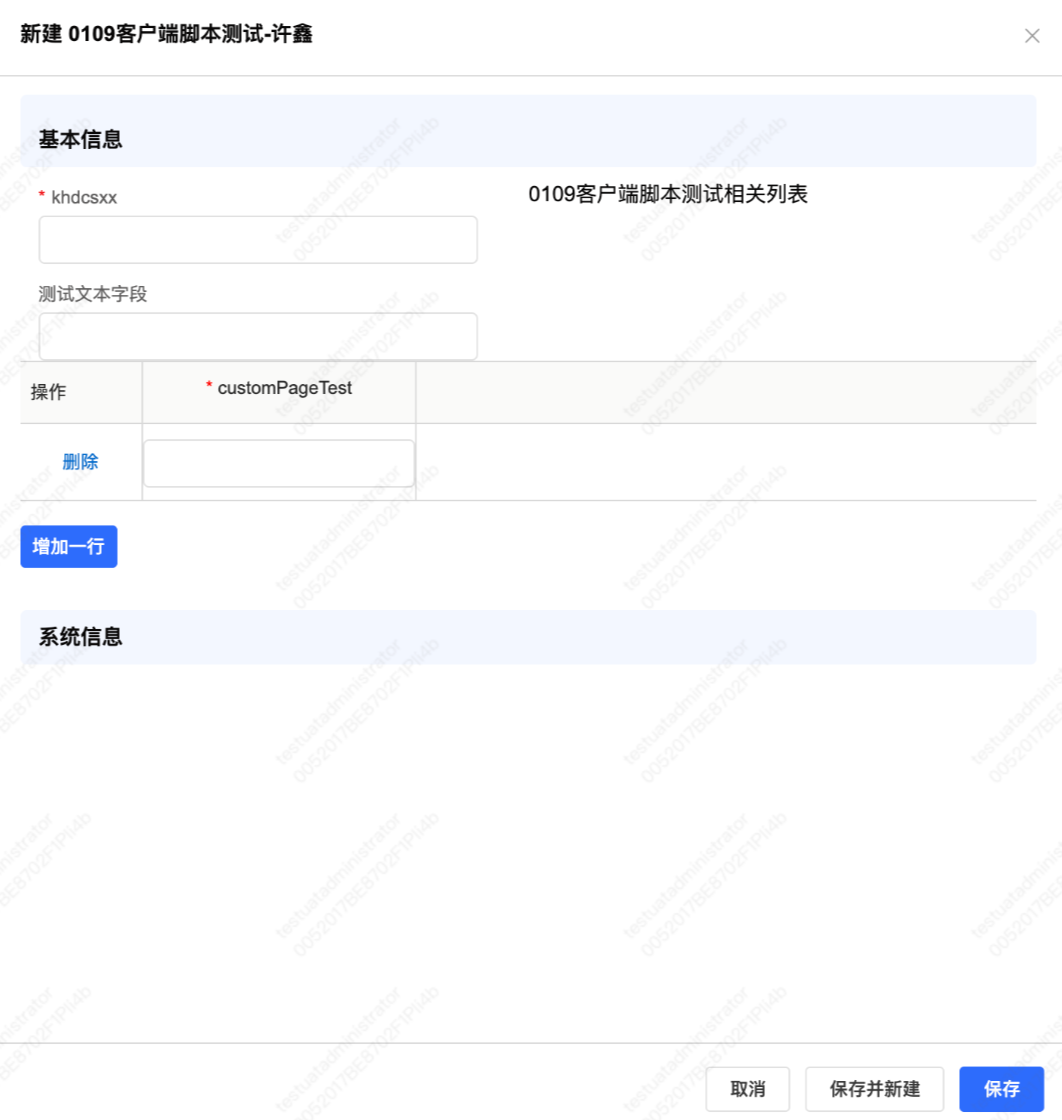
注意
- 需要考虑dom节点还未渲染导致没有找到的情况,建议使用定时器查找dom,存在时在进行操作
- 具体情况可能受加载、网络影响,编写完对应脚本需要进行测试
示例:更改应用程序、顶部菜单背景色
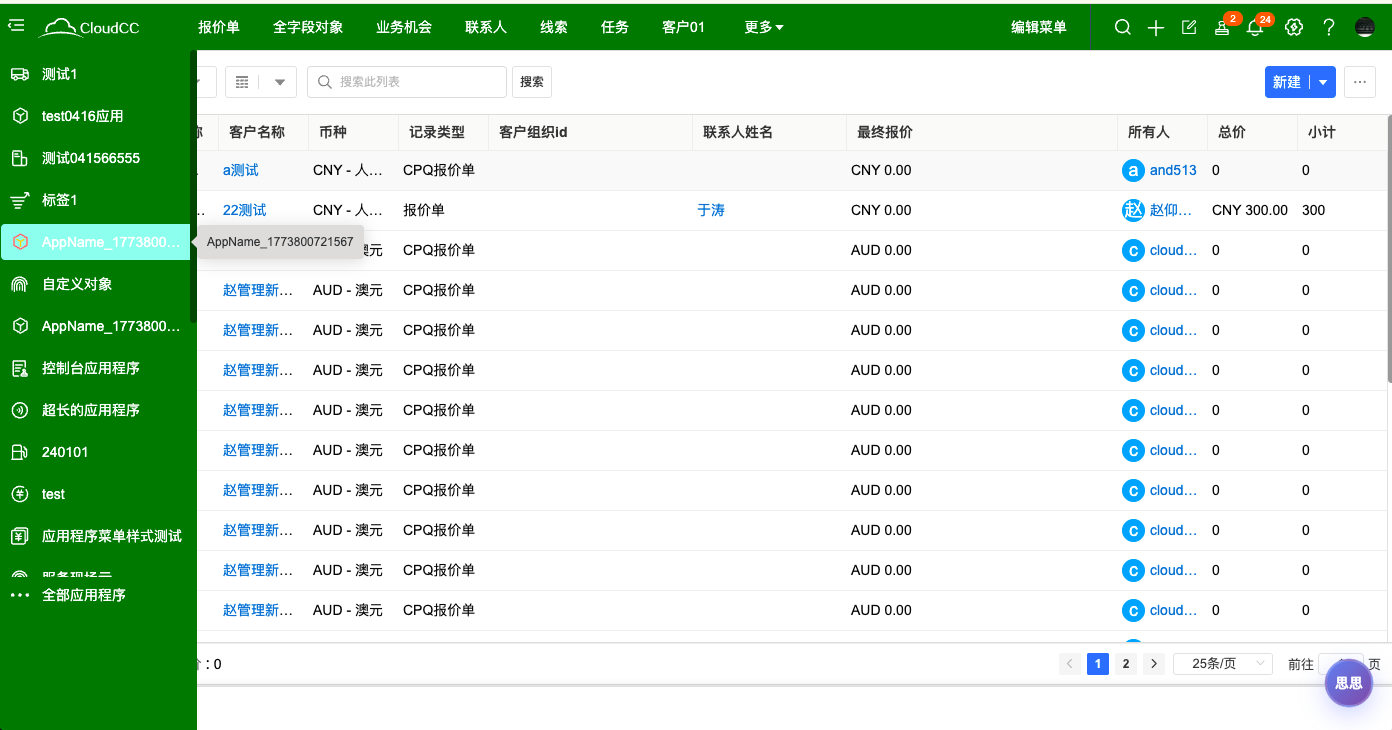
创建一个场景为应用状态,事件为onload的客户端脚本,其中背景色变量可以根据需求更改
const yellow='#227700',hover='#227700',active='#227700',text='#333333',border='#227700';脚本代码如下:
// 客户端脚本:
(function() {

const yellow='#227700',hover='#227700',active='#227700',text='#333333',border='#227700';

const css = `

:root{--cc-menu-yellow:${yellow};--cc-menu-yellow-hover:${hover};--cc-menu-yellow-active:${active};--cc-menu-text:${text};--cc-menu-border:${border}}

.header,.header .topcontentmenu,.header .menuContent,.topTitle,.title_Block{background:${yellow}!important}

.header .applicationName{color:${text}!important}

.topTitle .edit-menus{color:${text}!important;border-right-color:${border}!important}

.data_menu,.data_menu .each_menu,.data_menu .new_tab_all_menu,.data_menu .moreMenus,.data_menu .more-menusbox{background:${yellow}!important}

.data_menu .each_menu span{border-color:${border}!important}

.topContent .data_menu,.topContent .curmenu-text-box,.topContent .tabWrapper,.topContent .each_menu,.topContent .moreMenus,.topContent .more-menusbox{background:${yellow}!important}

.topContent .cur-menu,.topContent .cur-menu1{background:${active}!important;border-top-color:${text}!important}

.mymore-menus,.mymore-menus .el-dropdown-menu__item,.mymore-menus .all-Menu-Btn{background:${yellow}!important}

#home_content#home_content.home_content .applicationList,#home_content#home_content.home_content .applicationList .el-menu-vertical,#home_content#home_content.home_content .applicationList .el-menu-item,#home_content#home_content.home_content .applicationList .el-submenu__title,#home_content#home_content.home_content .applicationList .first-menu,#home_content#home_content.home_content .applicationList .all-application-menu,#home_content#home_content.home_content .applicationList .el-menu--inline{background:${yellow}!important}

#home_content#home_content.home_content .applicationList .el-menu-item:hover,#home_content#home_content.home_content .applicationList .el-submenu__title:hover,#home_content#home_content.home_content .applicationList .all-application-menu:hover{background:${hover}!important}

#home_content#home_content.home_content .applicationList .el-menu-item.is-active,#home_content#home_content.home_content .applicationList .el-submenu.is-active .el-submenu__title,#home_content#home_content.home_content .applicationList .el-submenu.is-opened .el-submenu__title{background:${active}!important}

#full-screen>div:first-child{background:${yellow}!important}

`;

const s = document.createElement('style');
s.id='yellow-menu-style-console';
s.appendChild(document.createTextNode(css));
document.head.appendChild(s);

document.querySelectorAll('#home_content .applicationList .first-menu, #home_content .applicationList .el-menu-item.is-active, #home_content .applicationList .el-submenu.is-active .el-submenu__title, #home_content .applicationList .el-submenu.is-opened .el-submenu__title').forEach(el=>{el.style.backgroundColor = el.matches('.is-active, .is-opened .el-submenu__title')?active:yellow; el.style.color=text;});
 const ID = 'cc-l1-menu-color-fix';
  document.getElementById(ID)?.remove();
  const style = document.createElement('style');
  style.id = ID;
  style.textContent = `
    /* 一级菜单默认:白色字体(覆盖组件在 is-opened 时内联的 #333) */
    #home_content#home_content.home_content .applicationList .el-submenu:not(.is-active):not(:has(.el-menu-item.is-active)) > .el-submenu__title {
      color: rgb(255, 255, 255) !important;
    }
    /* 展开但未选中二级时背景保持深色,避免白字看不见 */
    #home_content#home_content.home_content .applicationList .el-submenu.is-opened:not(.is-active):not(:has(.el-menu-item.is-active)) > .el-submenu__title {
      background: rgb(32, 56, 100) !important;
    }
    /* 所属二级被选中:一级菜单字体变为运单蓝 */
    #home_content#home_content.home_content .applicationList .el-submenu.is-active > .el-submenu__title,
    #home_content#home_content.home_content .applicationList .el-submenu:has(.el-menu-item.is-active) > .el-submenu__title {
      color: rgb(45, 108, 252) !important;
    }
  `;
  document.head.appendChild(style);
})();
样例代码效果图
进阶:页面与脚本事件的对应关系
系统所有的页面大致分为增删改查四类页面,每种页面支持不同的事件,用于实现不同的需求
| 页面 | 事件 | 平台支持 | 参数 | 触发时机 | 状态 |
|---|---|---|---|---|---|
| 全局类型 | onCreate | PC/H5 | Function test($CCDK,obj={}) - $CCDK全局工具 - obj预留配置对象 |
启动项目时(业务代码还没有执行) | 完成 |
| onLoad | PC/H5 | Function test($CCDK,obj={}) - $CCDK全局工具 - obj预留配置对象 |
展示UI时(首屏页面加载完毕) | 完成 | |
| onDestroy | PC/H5 | Function test($CCDK,obj={}) - $CCDK全局工具 - obj预留配置对象 |
关闭Tub签或更改流程时 | 完成 | |
视图页(列表)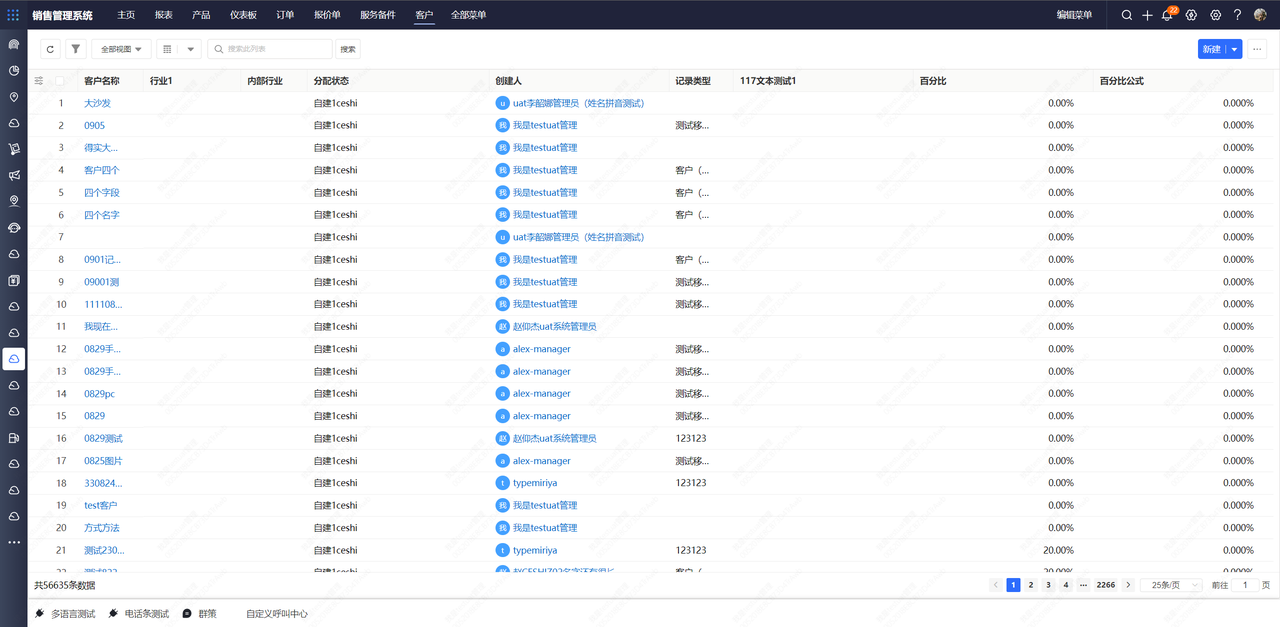 |
onCreated | PC/H5 | Function test($CCDK,obj={}) - $CCDK全局工具 - obj预留配置对象 |
进入视图页,但dom还没有创建的时候 | 完成 |
| onLoad | PC/H5 | Function test($CCDK,obj={}) - $CCDK全局工具 - obj预留配置对象 |
首次进入,或是点击搜索获取列表数据后 | 完成 | |
| onDestroy | PC/H5 | Function test($CCDK,obj={}) - $CCDK全局工具 - obj预留配置对象 |
离开此页面,比如进入详情页 | 完成 | |
新建页/编辑页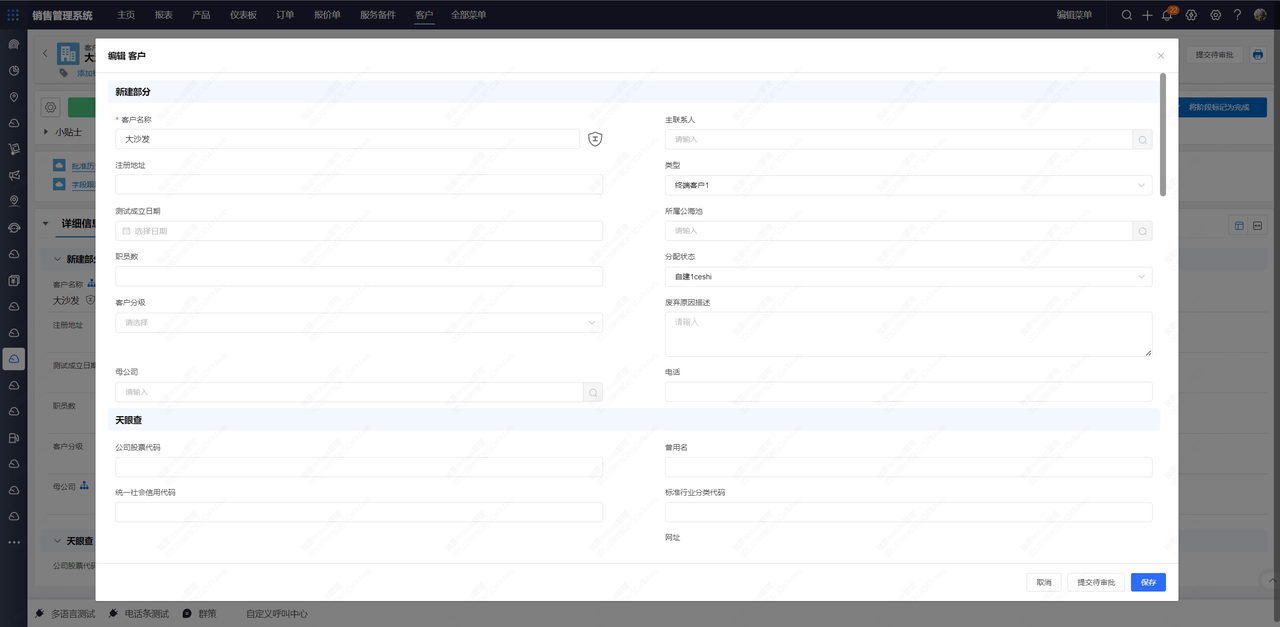 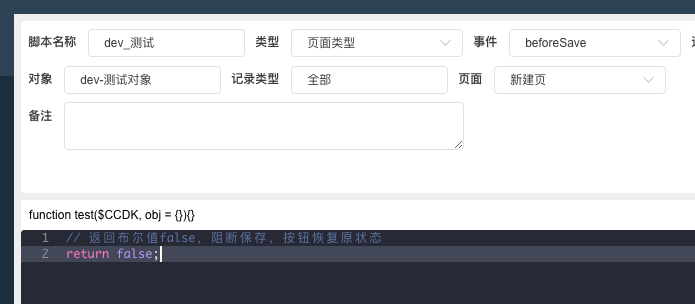 |
onCreated | PC/H5 | Function test($CCDK,obj={}) - $CCDK全局工具 - obj预留配置对象 |
进入新建/编辑页,但dom还没有创建的时候 | 完成 |
| onLoad | PC/H5 | Function test($CCDK,obj={}) - $CCDK全局工具 - obj预留配置对象 |
获取详情信息页面渲染后 | 完成 | |
| onDestroy | PC/H5 | Function test($CCDK,obj={}) - $CCDK全局工具 - obj预留配置对象 |
离开此页面,关闭的时候 | 完成 | |
| beforeSave | PC/H5 | Function test($CCDK,obj={}) - $CCDK全局工具 - obj - detailData详情页数据,key-value形式,可以修改 |
点击保存按钮时触发,return false,可以阻止保存动作 | 完成 | |
| afterSave | PC/H5 | Function test($CCDK,obj={}) - $CCDK全局工具 - obj预留配置对象 |
保存接口请求完成后触发 | 完成 | |
| onChange | PC/H5 | Function test($CCDK,obj={}) - $CCDK全局工具 - obj预留配置对象 |
编辑某个字段,光标失焦点,并且value有变化时 | 完成 | |
详情页 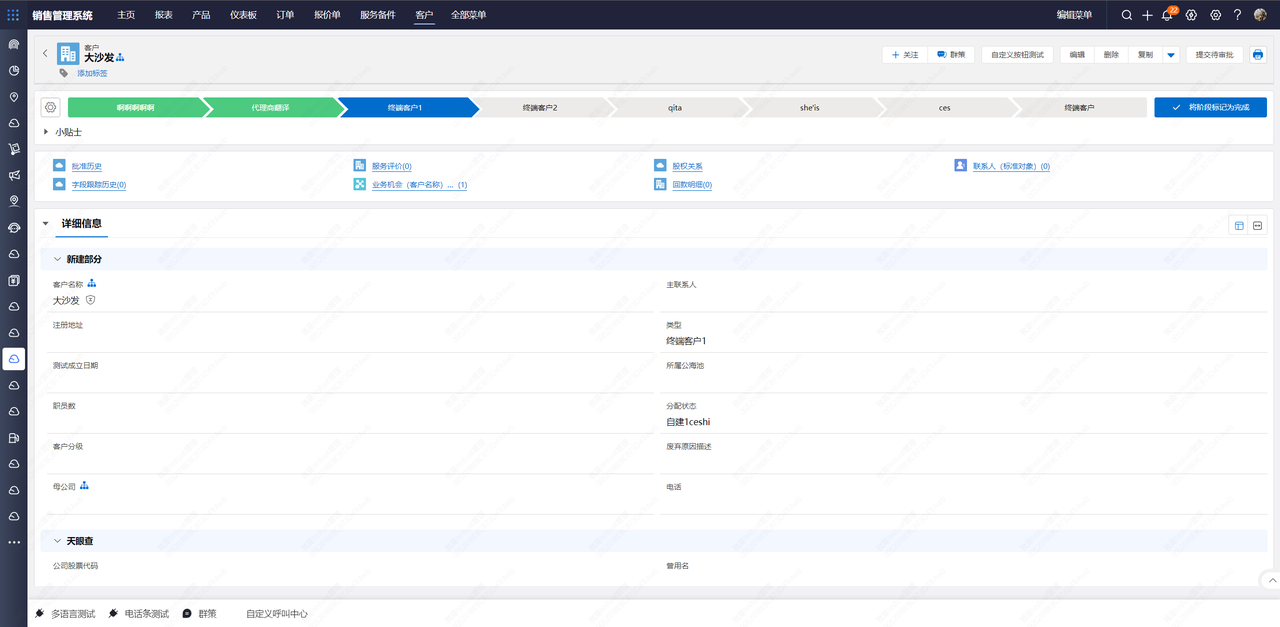 |
onLoad | PC/H5 | Function test($CCDK,obj={}) - $CCDK全局工具 - obj预留配置对象 |
获取详情基本数据,dom渲染后 | 完成 |